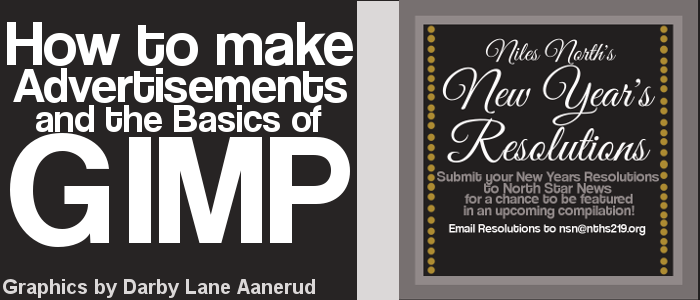
In this tutorial, I will show you the basics of GIMP, which may be used to make an advertisement to advertise an event or an offer. In this case, I am using an example in which North Star News would like to advertise on Instagram and other social media websites an opportunity for Niles North staff and students to submit 2014 new years resolutions that will be used in a later article. The finished product is above.
Gimp is a free downloadable editing software. It is very similar to photoshop. Gimp is a great program to download if you do not have photoshop and would like any easy program to use when editing photos or making graphics.
Before we get started, there are many helpful websites that can be used in the making of an advertisement.
Color schemes can be used to make the advertisement more presentable and pleasing to the eye of the reader. Colourluvers.com is a good website if you are stuck while thinking up a color scheme for your advertisement.
The website has premade color schemes made by users from around the globe. Type in a word or phrase that may fit the theme of your advertisement and browse the color schemes until you find one that is suitable. You can copy the HEX code of each color and copy it into the HTML coding area while selecting your colors in the tool bar.
Using interesting fonts can also make the advertisement more attractive to readers. There are many websites that can be used to find fonts, including 1001freefonts.com, dafont.com, and fontsquirrel.com. You can search certain fonts you found online, on other websites such as justfonts.tumblr.com, on these websites to see if there is a free downloadable version available. While searching for a font, make sure that the fonts downloaded will not clash together. A key tip is to use one bold and creative font for your main idea and for the rest use plainer fonts, which are usually ones that preset in gimp such as Arial and Times New Roman.
The first step in making your image is to determine the dimensions of your image. To create a new file, click file and then new. The program will ask you the width and height of your desired image. In this case, I will be using a 612 x 612 dimension because the desired image size on Instagram is 612 x 612. Press OK when you have set your image size.

Now you will want to start with a base or background layer.

The first box in the toolbox is where you click to select colors. Then a window will open where you can either select a color by clicking to select a color or pasting a HEX code into the HTML notation box.
Now to color the whole background a single color, select the icon that looks like a paint bucket in the toolbox. Then click anywhere inside your image using this tool and the whole image will be your set color.
With each new step, create a new layer. This way, you can easily delete mistakes and remove unwanted layers without having to excessively use the “undo” button and delete desired parts of the image. To create a new layer, click on Layer and then select New Layer in the drop-down menu.

Using a border in your image is also a great way to draw attention to your advertisement. A good border color is usually white or black. You can also use a lighter or darker shade of the background color because contrast may be interesting to the eye of the reader.
To make sure your border is straight, you can make guides. Click on the vertical ruler and drag down until you reach a desired distance from the top of the image. Do an equal length on the opposing vertical length of the image and horizontal lengths.
Arrow is pointing to the vertical ruler where you must click and drag until you are at your desired vertical border measure.

This is what your screen will look like while you are dragging the vertical line onto your image with the mouse.

This is what your screen will look like once a guide is set in place. If it is not at your desired measure, you may click on the guide again and drag it to change the measure.

This is a screenshot of the guides I am using for my advertisement.
Now you will use these guides to create your border. In order to create your border, you will choose the rectangle select tool, which is the top right icon in the toolbox, and then click and drag to choose a selected area, preferably along the guides. You will need to do this in 4 parts.

Using the rectangle select tool for one part of the border. In this picture, I am dragging the mouse to create a box with the rectangle select tool.

The white marching ants in a rectangle shape indicates the area has been selected.
Before you color in your selection, be sure to create your first additional layer.
After creating the layer, select the paint bucket tool and click inside the selected area.

This is what it will look like when you have the first rectangle colored in.
Repeat for each area you select with the rectangle select tool.

My finished border.
Now you may delete the guides, since you will no longer need them. You can do this by clicking on Image, scrolling down and hovering over Guides, and then selecting Remove all Guides. This will make all the guides on the screen disappear.

Removing guides
Next, you can begin to add text. First, make vertical guides so that the text is centered. You can also make horizontal guides so that the text is the same distance from the top to the bottom.

Guides are made to center the text. Text tool in tool box is highlighted.
Click on the text tool, which is the “A” in the tool box, and click inside the image. Type the desired text into the box. If the font is too small, you would like to change the type style, or change the color of the type, there should be another box above the box in which you are typing where you can select and change these elements. Be sure to highlight the text you would like to change before you select changes. If the text is not highlighted, it will not be changed.

In this picture, I am creating text for my image. The window above my text is where you can change the elements of the text.
The box that says “Arial Bold” is where you can change your text. The box to the right of it is where you can change the size of the text. The dropdown menu on the top far right is where you can change the measure of the text (pixels, inches, centimeters, etc.) The little boxes under the box in which you can further change the style of the text. There is a bold box, italic box, underline box, and strikethrough box. The next box to the right is where you can change the baseline of the text. The next to last box changes the spacing of the text. The last box is where you can select the color of the text.
Text editor is also an easy way to alter and change your text. If you double click on the “A” a box should pop up. You can select text editor by clicking the box next to the text that reads Use Editor. Text editor should open in a new window and you can change aspects of your font.

Select the box next to Use editor to use text editor

In this example, I use many different layers of text, with different text styles, to create my advertisement.
You can move your text by selecting the move tool in the toolbox, clicking on the text, and dragging it around your image. If you have guides on your image, the text will lock into place when you move it towards the guide.
When typing your text, make sure to be straightforward and make your message as short as possible. Too much text on one image can make it cluttered and may cause people to look over your advertisement. Also, be sure to make sure the different text styles you use don’t clash.
This is what my image looked like after I finished with text alterations.

Now you may add any finishing touches you may want to add to your image, including those using paint, brushes, or the pencil tool. In my case, I used guides and a close eye on the ruler to create dots along the edge of my image. Remember to create an extra layer when using these tools, because there are a lot of mistakes to be made!
The brush tool is very useful. There are many shapes you can choose from. You can then select the color and size of the brush by clicking on the icon in the toolbox that looks like a paintbrush.

This picture shows my finished vertical dot additions, which I made using the circle paintbrush shape. I altered the shape, opacity, and size by double clicking on the paintbrush icon and editing in a pop-up window named Tool Options.
Again, before you save the file, check your spelling and grammar in the text. Also, make sure all the text is centered.
To save, click file and then save. A pop-up window will appear asking you to name your file and determine a place where you would like to save it. When you are done, click save. To save as a jpeg file, click file and then export. Another pop-up window will appear where you may change the ending of your file to .jpg or .jpeg. Also, there may be a drop-down menu with options for formats to save your file. When you are done, click export.
Now you know the basics of Gimp! You can embellish or improve upon photos uploaded into the program. You can also be creative and create greeting cards and invitations. These basic skills are the stepping stones to becoming more skilled and creating advanced advertisements and art work.